Our Five Ring Circus: Cooking
Showing posts with label Cooking. Show all posts

Friday, July 24, 2015

Easy Breakfast Hack That Saves Time and Money

As a mom of 4, I'm always looking for ways to save time and money!

Feeding a family of 6 can be expensive and very time consuming! I go to the grocery store AT LEAST 3 days a week, and that includes the big weekly shopping trip.  The amount of food my kids consume in the summer is astounding!  

Let's talk time. Time? What's that?!? Most days it seems like I finish cleaning up from one meal and have to start all over again.  I always joke that I'm constantly feeding little humans! And just when I think I'm done for the day and can relax, someone needs a snack!

That's life in a big family, and although it can be stressful, I wouldn't trade it for anything!  However, I do have one little trick up my sleeve that saves time AND money!

Right after Lily was born, Dylan started first grade and Lexie started Pre-K.  Our mornings became rushed chaos, and I found myself shoving bowls of cereal and store-bought frozen waffles at them. One day, while I was making Sunday brunch, it hit me that I should make EXTRA pancakes, and freeze them for the week! 

Everyone in our family loved pancakes, and they could be reheated very quickly and even eaten on the go! I immediately started that method and it turned out to be the best breakfast hack!  

Making freezer pancakes has been a part of my weekly routine for almost 4 years. Now, I'll share my "secret" with you! 

breakfasthack

EASY FREEZER PANCAKES

Ingredients:
  • Boxed Pancake & Waffle Mix (Our favorite is an organic one, but it's almost always sold out. This whole wheat mix is the next best thing! If you want to step it up a notch, make your own homemade version!)
  • Blueberries, Chocolate Chips, Strawberries, Bananas, Wheat Germ, Chia Seeds, and/or Granola. (My kids requested blueberry and chocolate chip pancakes this week!)
  • Banana (or apple) Baby Food   
 015

My "secret" ingredient is baby food.  Lexie refuses to eat most fruit, so I started sneaking in Lily's homemade purees for extra nutrition. It blended in well and gave the pancakes a bit more flavor.  Lexie had NO idea so I just kept doing it!  

Making the pancakes is so simple and quick, especially if you have an electric griddle!  It's an absolute must for a bigger family! (Seriously. I love ours!) The first step is to choose your ingredients and prepare the mix:
  • Decide how many pancakes you want to make, then prepare the mix according to the directions.
  • Mix in a large container of banana or apple baby food.
  • Add your chopped fruit or other ingredients and stir. 
004

Once your mix is prepared, it's time to grease the griddle (I use olive oil) and decide if you want to make large pancakes, mini pancakes, or a combination of both! I always make mini pancakes, but I usually make a batch of large pancakes, too.  The mini pancakes are so easy for Lily to eat and Liam can just pick them up!

To make the mini pancakes, drop the mix onto the griddle using a 1/2 TBSP measuring spoon.  It works perfectly, and makes a lot at once! And, obviously, bigger spoon=bigger pancakes!
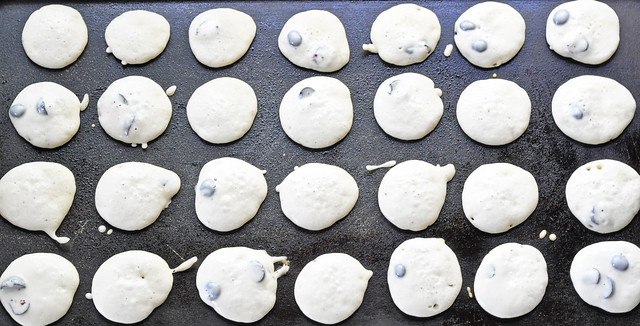
026

Give them a flip, allow them to cook on the other side, then stack them on a plate to cool! Repeat the process until all the mix is gone.

068

Once the pancakes cool down, put them in a freezer storage bag, label the bag, and add the date they were made.

093

I always make two varieties of pancakes, so I just repeat the process with the next batch!

chocolatechippancakes

It only takes about 15 minutes start to finish and the pancakes last the entire week! 

They're perfect for my entire family! They can be heated up in the microwave in just seconds. Grant doesn't have time for a meal before work, so he can heat one up and eat it in the car. (This also applies to me as I'm running out the door to take the kids somewhere!)  Dylan and Lexie know how to microwave them, so they can prepare their own breakfast if necessary.  The mini pancakes are the perfect size for Lily and Liam, and I don't have to cut them up.  

065

This method is a win for everybody!  It saves time, and, if you compare the cost to a box of store-bought pancakes, it saves money, too!

Oh, and of course, on the days I make the pancakes, we have them for breakfast!  

043
063

And on those busy mornings when there isn't much time to eat?  Quick AND easy!

108

What are your favorite breakfast hacks to save time and money?

 LET'S CONNECT!
TWITTER // FACEBOOK // INSTAGRAM // BLOGLOVIN // GOOGLE+ // PINTEREST
 

Thursday, January 26, 2012

Homemade With Love

Photobucket

When I was pregnant with Lily, I decided that I was going to make all of her baby food.

Let me preface this by saying that I have nothing against store-bought food. That is all I fed to Dylan, and mostly what Lexie ate. I did make a few purees for her, but never really put much thought into it. I even have a few "just in case" containers of store-bought food for Lily.

After much thought and reading up on it, I made my decision. I figured that I already make homemade dinners for my family 5 nights a week, so why not hers?

I began making her food shortly after she started solids, and have quite a collection stored in the freezer now!

Photobucket

I can honestly say that it's easy. It's incredibly inexpensive. It's healthy. I know exactly what goes into her food.

I've been making her food for almost two months now, and I have learned quite a bit!

{1} You do not need an elaborate baby-food making system. All you need is a blender, BPA free ice cube trays, and freezer storage bags.

{2} It's not very time consuming. I can make a batch of baby food in ten minutes or less.

{3} The vegetables have to be steamed before pureed (as do some fruits). If you serve steamed vegetables with dinner, set aside a portion to turn into baby food, before serving. Many times, I have pureed some vegetables while preparing our dinner.

{4} It saves SO much money! I can get the equivalent of 16 jars of stage 1 baby food from one bag of organic frozen peas, bought for $1.00 (with a coupon). If you know somebody with a garden, ask for extras. That's "organic" gardening at it's finest. I received a bag of home grown sweet potatoes for free!

{5} You can adjust the thickness and amount of cubes your child will eat as he/she grows.

{6} You thaw out only the amount of cubes your child will eat. If he/she wants more, it's easy to just thaw one more out. Less food waste!

{7} Most food can be stored in the freezer for 3-6 months. Because of this, you are likely to always have a wide variety to choose from!

{8} Food should be thawed in the refrigerator or it can be microwaved. Leaving it on a counter to thaw promotes bacteria growth.

{9} Homemade food looks a lot different than store-bought food. You can make it thinner by adding breast milk, formula, or water, or you can just simply puree it as is to make it thicker. A lot of store-bought food seem gelatinous in comparison.

{10} Soft foods such as bananas, berries, and avocados do not need to be steamed first.

{11} Think outside the box! There are many different flavors and combinations to try: Pumpkin, Avocado, Blueberry/Banana, Apple/Blueberry, Apple/Strawberry/Banana, Carrots/Apples, and Squash/Pear to name a few! Lily's favorite food is pumpkin!

There are many different ways of making your own baby food. After much research, I found a method that works for me.

I choose the fruits or vegetables I'm going to use, and then steam or boil them. I strain out the cooking fluid into another pot, and then transfer the food to the blender. I begin to puree, and add some of the retained cooking fluid to adjust the thickness. In the past, I've also used pumped breastmilk, but more often, I use the water the fruit/vegetable was cooked or boiled in.

Once the food has reached the desired consistency, I pour into BPA-free ice cube trays, and freeze.

Photobucket

After several hours in the freezer, I transfer the cubes to freezer storage bags. I write the date and flavor on the outside of the bag.

When it comes time for Lily to eat, I transfer the cubes to a glass bowl. Sometimes, I will do this in the morning, and allow the food to thaw in the fridge, but most of the time, I do heat the food in the microwave.

Photobucket

I typically microwave for 30 seconds, always in a glass bowl, and then stir to dissolve the remainder of the frozen sections. The food is the perfect temperature for Lily!

Photobucket

It took a few weeks, but Lily is finally starting to enjoy solids! She loves apples, pumpkin, and apple/strawberry/banana blend. I love the fact that I have a freezer full of healthy baby food to feed to her!

Photobucket